Haist! Been having a very stormy weekend and it's still raining hard today! My DSL antenna has been knocked out by the strong winds and my wifi signal's going like crazy -- now there's connection, now there's none! Aaaargh!
Had to keep busy editing and erasing files from the hard drive and the external drive. Pathetic!
Stay safe people!

Tuesday, July 31, 2012
Sunday, July 29, 2012
Bootleg - my 1st Creative Scrappers Challenge Entry
Hello fellow scrappers! Hope you're all having a relaxing Sunday today.
I've done an (almost but not quite) 30-minute layout last night following Creative Scrappers Sketch #216:

and here's my take on the sketch:


I've decided to use the photos of the last time I was with my highschool BFFs (the almost 19! of us in a wedding in 1996) and titled it bootleg because that was our group name. We even have a mascot of sorts LOL!
Alphas were just random puff & foam stickers and mother-of-pearl beads (I ran out of O's! LOL).

I've
never done a smorgasbord-alphas for a title before, but on hindsight, I
guess it best reflected our harmony and friendship in diversity, and
we're still a bunch of pretties LOL!
I didn't use any patterned paper for background because I kinda liked how the white acrylic with glitters and alcohol inks turned out on this page -- it already has colors and texture.
Instead of journal-ling, I printed all our names on a patterned paper.

Flower cutouts came from the Pocketfull of Posies cardstock, the photo mount from Prima Odyssey collection, the title mount from an old DCWV paper pack. Just added DIY flat-backed clay pearls and a wood button with a ribbon. I just had to add the bootleg mascot somewhere (was kinda rusty but I guess I drew it okay & made me shake my head that decades after I still have no effing idea what it is! LOL!)

I wanted to follow the sketch religiously but I was adding on my A Happy Scrappy Life chipboard book album so I had to cram it all on an ~8 x 8 page. Thank you Creative Scrappers for such a wonderful sketch --enabled me to reminisce on one of the happiest years of my life!
There you go. Thanks for dropping by! Have a happy scrapping Sunday!
Saturday, July 28, 2012
A Decade is Nothing But a Blink of an Eye
Hi everyone!
Just finished my 2nd entry to Sketches in Thyme Challenge #85, a double-pager:
I still have a few pages left in my A Happy Scrappy Life chipboard album so I was quite happy to make a layout from that sketch. I had to take a break to watch the Opening Ceremonies of the 2012 London Olympics LOL! Here's my take on the sketch:

Color combination is really my waterloo in crafting. I don't have the artist's eye on what should go with what or what clashes with what. Even with a color wheel I'm at a loss so I just do my thing and whatever comes out, well, that's that.
A detailed look on the left-side page layout:

and the right-side page:

The background paper is just a page from a coffee-stained 12x18 sketch pad which I crumpled then dried on a medical diaper mat. The "bricks" effect is kinda accidental because I stacked a few stained paper and the lowest ones got those shapes!
I coined "a decade is nothing but a BLINK of an EYE" as title because the photos I used were taken exactly 10-years apart -- my son was just a few months old while his sister barely 3 while the other photos were taken when they were barely 13 and 10, respectively.
I printed "a decade xxx" on a yellow tracing paper cut into a circle then stamped with Autumn Leaves Round & Round stamp using Dew Drop blue ink (why blue I just don't know LOL!). Blink and eye are heat embossed using Judikin's fine black embossing powder, the rest are just freehand lettering with my Sharpie.

Detailed embellishments used (all DIY): I heat embossed the butterflies in 3 layers (I was hoping for that cracked glass effect but I used fine powder and as always, got impatient!) I sprayed the fabric flower with my DIY alcohol inks and just scrunched them and added mica powders later.

Wood button is from All About Scrapbooking, frames are hand cut and distressed with eye shadow powders. The ribbon came from the bouquet my mother-in-law received from her last birthday and given to me :D

I attempted to replicate what Tim Holtz did in a video tutorial on Perfect Pearls and water. Since I don't have Perfect Pearls, I just used eye shadow powders LOL! Stamped the image with Versamark then brushed the powders on the stamped image, spritzed with water then dried with my heat gun. I did 3 using different powders but the other 2 (in pink and blue) was covered with the photos.

I used a DCWV patterned paper and a Pocketful of Posies cardstock and cut a piece of this tree branch and added that rub-on blue bird on the branch.
Hope you like the layout, I had fun as usual, still high from both finishing the layout and the Olympics Opening Ceremonies, and because I have such a weird mindset, the only part that would stick to my mind would be Mr. Bean cheating the finish line in his dreams! LMAO!
Thanks for dropping by! Have a nice 2012 Olympics week (s)!
Friday, July 27, 2012
check out my old layouts and be surprised :D
Still haven't started on an intended entry for Creative Scrappers challenge so I uploaded my old scrapbook pages (see Old Layouts tab below the header :D).
Be surprised at the evolution of my scrapbooking. Really pathetic! LOL
Wednesday, July 25, 2012
Behind Every Great Man is a SURPRISED WOMAN
My Entry to Sketches in Thyme #84 Challenge & Frosted Designs Fabulous Friday Patterned Paper Only Challenge
I joined two challenge blogs last night and was inspired to make another layout. Sketches in Thyme #84 Challenge has this sketch:

Frosted Designs Fabulous Friday Challenge on the other hand challenges scrappers to use ONLY patterned paper on any project (layout, cards or altered art), no cardstocks.
And here's my take on both challenges:

I just love putting unflattering and goofy pictures on my pages. I find it extra harder to think of a layout or a title when subjects are "posed". 95% of my past layouts (especially those decades ago) are on the hilarious and funky side, mostly telling a story, or if not, just some random funny title like this.
I had this quote for a long time now and I forgot where I got it or who said it. I had the words printed out on a rouge de garance Vivaldi paper pack collection, cut into strips, distressed and inked the edges. I used two patterned paper tags as mount for the words SURPRISED WOMAN and used pearl brads to secure. I used kraft paper twine as the main circle and simply tied a square knot (saves me having to put in another embellishment! LOL!).


I printed out a retro winking woman on another Vivaldi paper, cut it into a circle, inked and used foam mounts to secure. The arrow and stars chipboard embellishment is from All About Scrapbooking.


The other patterned paper I used (the circles one) is from DCWV paperpack from way back. I just added a piece of maroon mulberry paper. I sprayed the main background paper with my DIY alcohol inks.

Not only did I enjoy the sketch and the patterned paper only challenge but it proved to be a very non-expensive way to make something as nice as using the more pricey cardstocks. I have only used two individual 12x12 patterned paper and very small pieces of two 6x6 paper for this layout if you exclude the main background paper.
Thank you Sketches in Thyme and Frosted Designs for your really interesting and fabulous challenges! Can't wait to do more of your challenges.
Thanks for dropping by & happy scrapping! :D
Three Challenges in One Layout!
Hi everyone!
I was surfing the net for blogs with sketch challenges and stumbled into a number of wonderful sites. I specially love Let's Get Sketchy!, another freaking scrappy challenge, Sketches in Thyme among others.
I know I've already submitted an entry to Lasting Memories Black & White with a Splash of Color sketch challenge with "I Sometimes Miss the Old Me" layout. But I was inspired by Another Freaking Scrappy Challenge's current challenge which is something about your country or ethnic group.
As I was looking for a possible sketch, I came across Let's Get Sketchy!'s current sketch challenge #21

So I thought I would enter AFSC's country/ethnic group challenge using LGS!'s sketch and still adhering to the black & white challenge of Lasting Memories (I was still in the B & W mode LOL!)
So here's my take on all three challenges:

This is my daughter's first school acting experience LOL! Every August, the Philippines celebrates Linggo ng Wika (National Language Week) in honor of the country's Ama ng Wikang Pambansa (Father of the Filipino Language) which is Manuel L. Quezon, the First President of the Philippine Commonwealth in the 1930s.
 |
| I put the words "Linggo ng Wika" on a cardstock then cut it using the ticket stub shape of the Cuttlebug Vintage Collage cutting & embossing folder then inked the edges. |
Every school in the country has their own week-long celebration usually culminating in intra-school/inter-level contests. That year, the school held a drama/play contest with my daughter's class out-winning all the higher elementary levels by bagging First Place!
 |
| I put strips of black & white ribbon/fiber along the side as border, tied into a bow in one corner and just a square knot on the other. |
The title is "Lola Iska" or Grandma Iska in English because that is my daughter's character in the play. She played the grandmother telling Philippine history in a nutshell to a group of kids with the rest of the class acting out the story.
 |
| I cut a black cardstock for the title & stamped the stitches image below |
| We pratice her lines and making her voice really sound like a very, very old grandmother and oh boy, was she brilliant! LOL! She bagged the "Best Actress" award for not only looking like a grandma but convincingly sounding like one. That's why this particular celebration is specially memorable. |  | |||
| The paper is actually the negative space of the scalloped paper I used in the I Sometimes Miss the Old Me layout! |
Here are detailed images of the embellishments I used:
 |
| Scalloped cardstock, layered buttons and Tim Holtz Caged Bird cut out, distressed and inked |
 |
| I layered a white button with flourish design on a larger black button and then used the corresponding black flourish button on this butterfly embellishment. |
I hope I've conveyed something about my country albeit through my daughter's personal experience. This is such a fun-to-do layout. Thank you Let's Get Sketchy! for a great sketch, Another Freaking Scrappy Challenge for that great layout subject and Lasting Memories for the very interesting B & W technique!
Thanks for dropping by and have a nice scrapping day!
Tuesday, July 24, 2012
MY LOVE AFFAIR WITH ALUMINUM FOIL
At the start of 2012, I lost my appetite for crafting embellishments after doing loads of flowers, butterflies, dragonflies, birds. And yet, I still can't get my motivation to make scrapbook pages again. I scouted my favorite youtube channels like jennings644 and rach0113 for inspirations. They're wonderful scrappers and their tutorials are really easy to follow and Ms Fiona (jennings644) is extra hilarious to boot!
Anyway, I came across this faux forged metal projects using aluminum foil sheets, acrylic paint and metal finish pastes and all sorts of thingies you may want to incorporate. Here's rach0113's foiling technique tutorial:
And here's Ms Fiona's take on the same technique:
I so enjoyed their vids that I raided our kitchen and looked at my stash of metal charms and small thingamajigs. And that my friends is how my foiling technique addiction started.
I would say that the crumpling is actually the hardest part because you have to take care to avoid tearing the foil so much. But it doesn't matter if there's tearing since they'd get covered with paint anyway.
At first I followed Ms Fiona's, I put lots of whatnots in the projects I made. And here are my initial take on their tutorials:
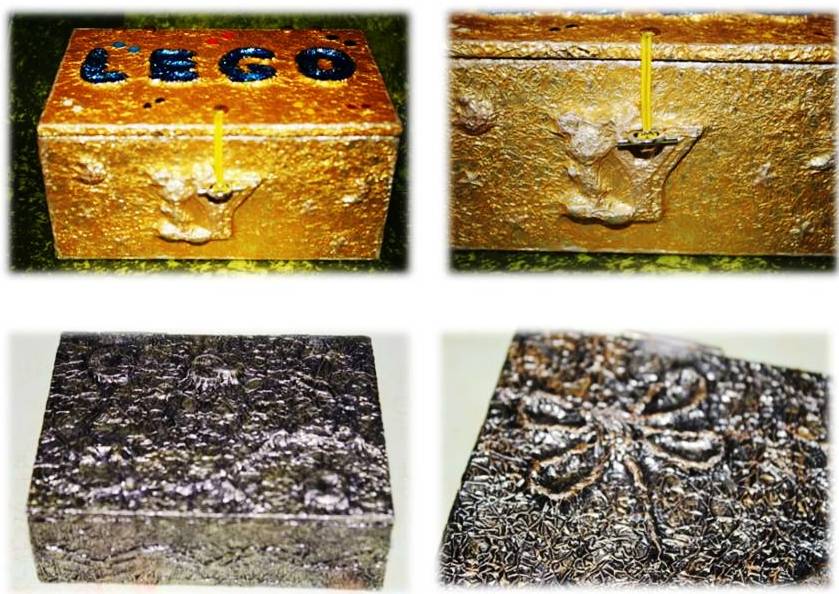 |
| The LEGO box is made-to-order by my son, he wanted blue LEGO letters on top and gold paint all over, no black. He's actually using it to store his Lego mini-figures :D |


I got tired of making boxes with hinged lids so my thoughts ran into making other objects and came up with these photo frames:
 | ||
| I used the scraps of foil & twisted it to make the letters & shapes |

After the frames I moved on to covering a whole canvas with crumpled foil and sprayed it with my DIY alcohol inks. The canvas is really blinding to the eyes but the effect of the alcohol inks is pretty psychedelic.

Every end of school year, I make souvenir crafts for my kids' teachers and classmates. What I craft depends on what I'm into at the time (I made small amigurumi key chains last year :D). This March I made these key chains among others:

After a time I got fed up with scrounging for bits and pieces to put in and the occasional tearing of the foil because of the embossed objects. So I thought I'd modify this technique and do away with the bits and just stick to crumpled foil.
It turned out lots easier and even better actually, if I may say so myself LOL! I'm like my favorite detective Hercule Poirot who is a stickler for symmetry. I'm not much into cluttered designs and layering. I want to see balance. Simple and clean but with prettiness, too.
So my foiling projects evolved into these:
 |
| Made these candle & pen holders from the cardboard tubes of the aluminum foils I've used! |

 |
| These bags are just cardboard pieces where I glued the foil. |
When I finally (!) got a Cuttlebug, my addiction took these forms:


 |
| These Tim Holtz Caged Birds will be the subject of another blog post :D |
 |
| as well as these multi-media art :D |
Doing some general house cleaning in the 2nd quarter of this year, I realized we have loads and loads of old and scratched CDs/DVDs. I racked my idea bin on what to do with them aside from the usual. I stacked 3-4 CDs, cut a strip of thick chipboard and glued it around the CD and made round boxes!

I put some of the foiled butterflies on the first tall boxes I made (all painted with black & metallic bronze and copper acrylic paints):

Ran out of old CDs so I put the scraps of chipboard from the Sizzix Stitched Frame I cut and made smaller boxes:
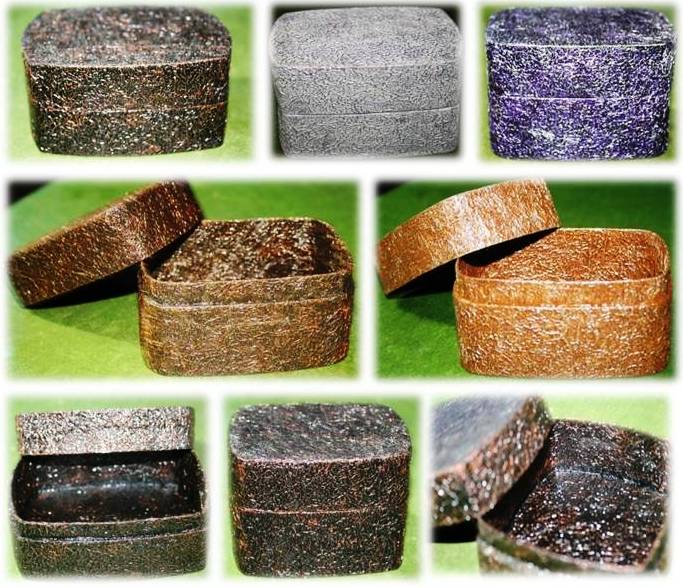
Feeling bolder, I crafted shaped boxes like these heart-shaped boxes in different sizes:

This is one of my faves--"You're a star and you're a box, so I shall call you, STARBOX." LOL!
 |
| Used a Ferrero chocolate container as template for these STARBOXes! :D |
When I ran out of chipboards, this KFC chicken meal box caught my eye:

It transformed into another of my foiled boxes! Adding varnish made the boxes sturdier not to mention shinier.

My daughter chided me one time that there seemed to be nothing in our house that I wouldn't cover with foil! I had to will myself to stop, I feel like the artist Cristo (hmmm, maybe I could suggest he cover a whole building with aluminum foil next time! LOL!).
It's one ingenious way of recycling. I even covered a big cracked (really hideous!) old Tupperware container with all the scraps of foil left from all my projects. I use it now to store all my foam stamps. :D


I had 3 of these de-worming tablet containers from a Rotary Club project my husband spearheaded 4 years ago. These containers weren't used because of the expiration date and there were cracks on the lids. The tablets were disposed of but I kept the packaging. They were added to the list of my aluminum foil victims!


These cellphone and chocolate boxes did not escape my foil mania, too!


It does feel good that from these tutorials I've done a lot of variations and created a lot of functional projects. I owe a lot to Ms Fiona and rach for the inspiration. My heartfelt gratitude, ladies!
Thanks for dropping by again! Happy crafting!
Subscribe to:
Posts (Atom)